Stories
Hiveword is all about organizing stories. You can have as many stories as you want and you can do any level of organizing from just a bit to very detailed. The choice is yours!
To create a story, navigate to the story list. You can do this in several ways. The easiest may be to simply click the Hiveword logo in the upper left hand corner from wherever you are. The second way is to click "Stories" in the main navigation sidebar.
Once you're on the stories list screen, click the New button to create a new story.
Story Details
The story screen displays the title (which you can change) as well as several input fields for you to supply data.
If you'd like to add other fields of your choosing (Theme, for example) to the details page, you can do so with the Hiveword Plus upgrade.
There are also buttons for performing a variety of actions. Starting from the left side, the Notes and Images buttons are only visible to Hiveword Plus users. These two buttons allow you to add notes and images, respectively, to the story.
The Save button saves the data in the detail fields.
The Delete button deletes the story in its entirety. Thus, any scenes, characters, etc., within the story are deleted, too. For Hiveword Plus users, notes and images are also deleted. Please note that deletion is an unrecoverable operation.
Finally, the Actions button allows you to print or download the story. You can print/download just the story detail page or all of the story components. If you're a Hiveword Plus user you'll also get menu items for managing custom fields for stories.
Story Components
A story is populated with scenes, characters, settings, etc. These are called story components. How you use story components is totally up to you.
There are two ways to add a new story component: The New button on the component list page and the context menu on the same page. For example:
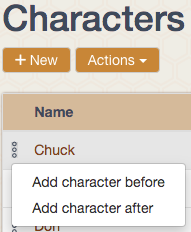
In the screenshot, we're viewing the list of characters. To add a new character to the end of the list, click the New button. If you want to add a character in a particular spot, click on the stacked circles icon () and choose the before or after option as appropriate. In the screenshot, Chuck's context menu was clicked so the position of the new character will be relative to him.
The Actions menu has a Sort option if you want to manually re-sort.
Component detail view
When you are viewing a component's details, you can easily add a new component of that type (scene, character, etc.). To do so, click the Actions menu and select whether you want the new one before or after the one you are viewing. You can also add a new one to the bottom of the list.
